字体渲染
字体渲染
字体的种类
目前最常见的字体都是矢量字体,在早期,文字的渲染都是通过点阵字体的形式
点阵字体:
点阵字体和矢量字体可以理解为位图和矢量图的区别,矢量字体是通过数学公式去确定的字体轨迹,因此它可以很方便的缩放,而点阵字体就是有一群像素点组成,它不能很方便的缩放,也不能很方便的旋转。目前最常见的矢量字体是ttf,当然你可能也听过woff,woff是在浏览器上字体渲染的优化,他相比较ttf体积减少了40%,当然它本质还是ttf。
字体渲染的流程
在渲染之前,我们需要拿到一个.ttf的字体,并把它加载进来,我们可以通过font-kit这种工具加载系统已经安装好的字体。拿到字体之后, 我们需要去解析这个字体,我们可以使用ttf-parser, 解析之后,我们就可以实现光栅化某一个字符,在文本渲染中,这些光栅化后的字符称之为字形(glyph).但是目前只能光栅化某一个字符,并不能光栅化一个字符串,因此我们就需要对字形布局(layout),这个布局就是需要控制每一个字符和字符之间的位置,包括换行也是需要layout去做,fontdue是基于ttf-parser, 实现了光栅化和布局的功能,因此在加载完字体后就可以直接通过fontdue去做字体的渲染。
数字化字体
数字化字体讲述的是如何把一个字符的外形 通过数据的形式保存下来。
我们知道每个字符都有它的轮廓(outline), 每个轮廓又是由闭合的线构成(coutour), 这个闭合的线不管是曲线还是直线都是可以通过点来描述,例如两个在线上的点可以描述一条线段,两个在线上的以及一个在线外的点,可以描述一段二次曲线,通过线段和曲线足以构成任何你想要的曲线,因此最终存储在ttf文件中的都是一系列点和坐标
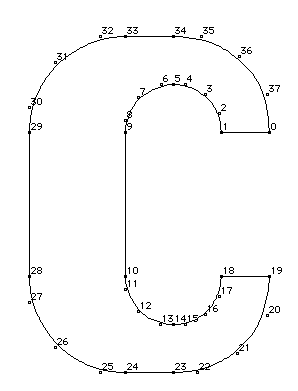
那这个坐标的又是以什么为单位的呢?
答案是font unit, font unit是的大小是由字体作者指定的,因此就会存在一个非常关键的属性units_per_em, units_per_em 每em长度有多少units, units越多,字体描述的越接近原先设计的形状。
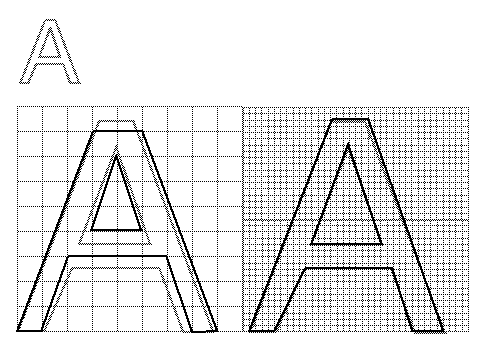
光栅化字符
光栅化字符分为三步,第一步将主轮廓根据想要展现的字符大小进行缩放,再对缩放后的轮廓进行grid-fit, 最后光栅化
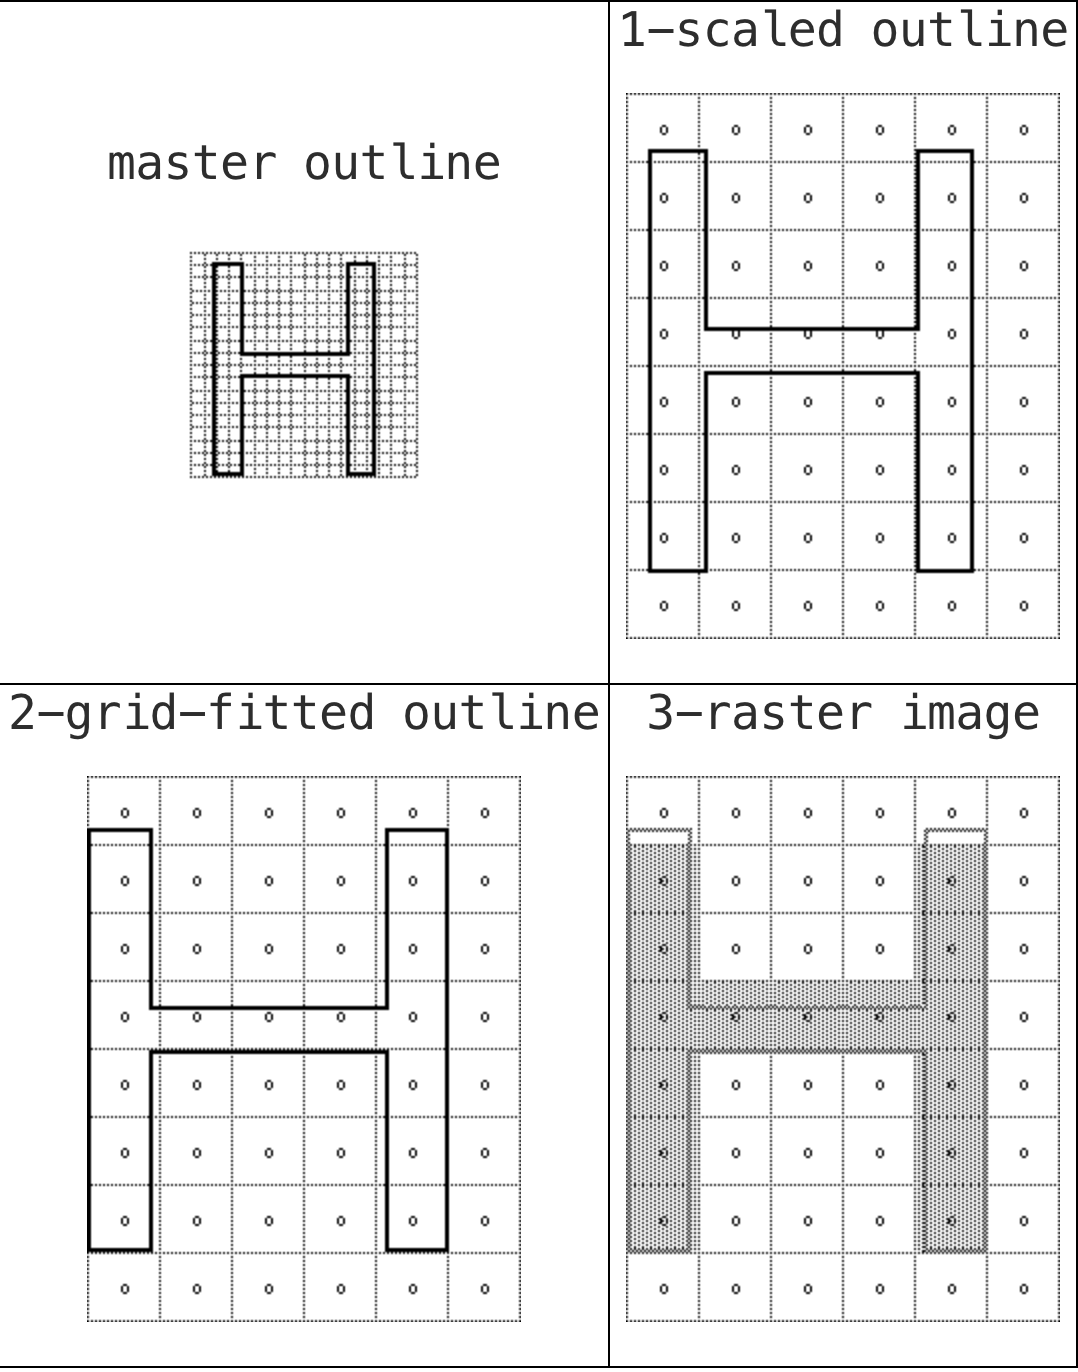
缩放:
pointSize * resolution / (72 points per inch * units_per_em).where pointSize is the size at which the glyph is to be displayed, resolution is the resolution of the output device and units per em is the resolution of the grid of which the master outline was originally defined. The 72 in the denominator represents the number of points per inch.
Grid fit是由一系列指令组成,详细的可以看这里
光栅化
gird fit后就可以进行光栅化了,光栅化的第一条规则就是
Rule 1: If a pixel's center falls within or on the glyph outline, that pixel is turned on and becomes part of the bitmap image of the glyph.
就是说需要判断这个像素的中心是否落在字形的轮廓里,判断的方法是从像素的中心向外发出一条射线(任意方向),记录一个count为0,如果轮廓从下至上或者从右到左穿过这条射线(on-transition),那么count++,如果轮廓从上至下或者从左到右穿过这条射线(off-transition),那么count--,如果最终的count != 0,那么就认为这个像素落在轮廓里面
接着就是一些特定情况的规则
Rule 2a: If a horizontal scan line connecting two adjacent pixel centers is intersected by both an on-transition contour and an off-transition contour, and neither of the two pixels was already turned on by rule 1, turn on the left-most pixel.
Rule 2b: If a vertical scan line connecting two adjacent pixel centers is intersected by both an on-transition contour and an off-transition contour, and neither of the two pixels was already turned on by rule 1, turn on the bottom-most pixel.
The scan converter can also be operated in a mode in which only dropouts are filled in and stubs are left as is (scan converter mode 1). Rules 3a and 3b describe its operation in this mode.
Rule 3a: If a horizontal scan line connecting two adjacent pixel centers is intersected by both an on-transition contour and an off-transition contour, neither of the pixels was already turned on by rule 1, and the two contours continue on to intersect other scan lines (this is not a 'stub'), turn on the left-most pixel.
Rule 3b: If a vertical scan line connecting two adjacent pixel centers is intersected by both an on-transition contour and an off-transition contour, neither of the pixels was already turned on by rule 1, and the two contours continue on to intersect other scan lines (this is not a 'stub'),turn on the bottom-most pixel.
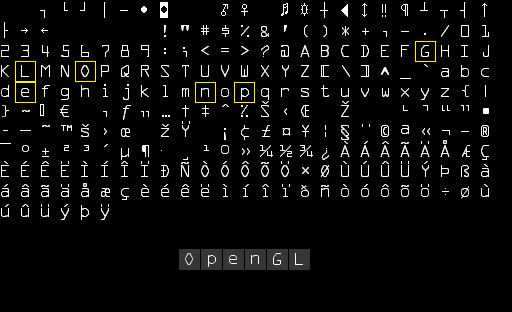
使用fontdue渲染字符串
想要通过fontdue渲染一个字符,非常的简单,README上面就有例子,但是fontdue并没有直接提供渲染字符串的例子,因为作者认为布局和每个字符的bitmap都给你了,那你自己就可以渲染(附上issue: https://github.com/mooman219/fontdue/issues/128)
我们先学习一下README上提供的例子
// Read the font data.
let font = include_bytes!("../resources/Roboto-Regular.ttf") as &[u8];
// Parse it into the font type.
let font = fontdue::Font::from_bytes(font, fontdue::FontSettings::default()).unwrap();
// Rasterize and get the layout metrics for the letter 'g' at 17px.
let (metrics, bitmap) = font.rasterize('g', 17.0);
由于fontdue只是个光栅化字体的工具,所以加载字体直接使用的include_bytes, 这会把这个ttf字体在编译时直接变编译成二进制的形式加入到产物中,你可以使用font-kit去代替include_bytes这一步。在rasterize(光栅化)后,我们可以得到metrics和bitmap,bitmap就是位图,metrics是用来描述渲染后字形的像素信息的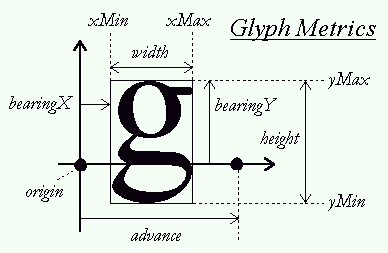
let font = include_bytes!("../assets/Roboto-Regular.ttf") as &[u8];
let roboto_regular = Font::from_bytes(font, fontdue::FontSettings::default()).unwrap();
let fonts = &[roboto_regular];
let mut layout = Layout::new(CoordinateSystem::PositiveYDown);
layout.reset(&LayoutSettings {
  ..LayoutSettings::default()
});
layout.append(fonts, &TextStyle::new(&self.text, self.font_size, 0));

let mut glyphs:Vec<Vec<u8>> = vec![];
// 光栅化渲染
self.text.chars().for_each(|c| {
  let (_, bitmap) = fonts[0].rasterize(c, self.font_size);
  glyphs.push(bitmap);
});
// 获取整个字符串的宽高
let dim= compute_dim(&layout);

let mut bitmap:Vec<u8> = vec![0; dim.0 * dim.1];
// 遍历每一个字形,将其渲染到合适的位置
for (pos, char_bitmap) in zip(layout.glyphs(), &glyphs) {
  let x = pos.x as i32;
  let y = pos.y as i32 as i32;
  let width = pos.width as usize;
  let height = pos.height as usize;
  let mut i = 0;
  for y in y..y+height as i32 {
    for x in x..x+width as i32 {
      let index = ((y * dim.0 as i32 + x))  as usize;
      if index < bitmap.len() {
        bitmap[index] = char_bitmap[i];
      }
      i += 1;
    }
  }
}