webpack原理
流程梳理

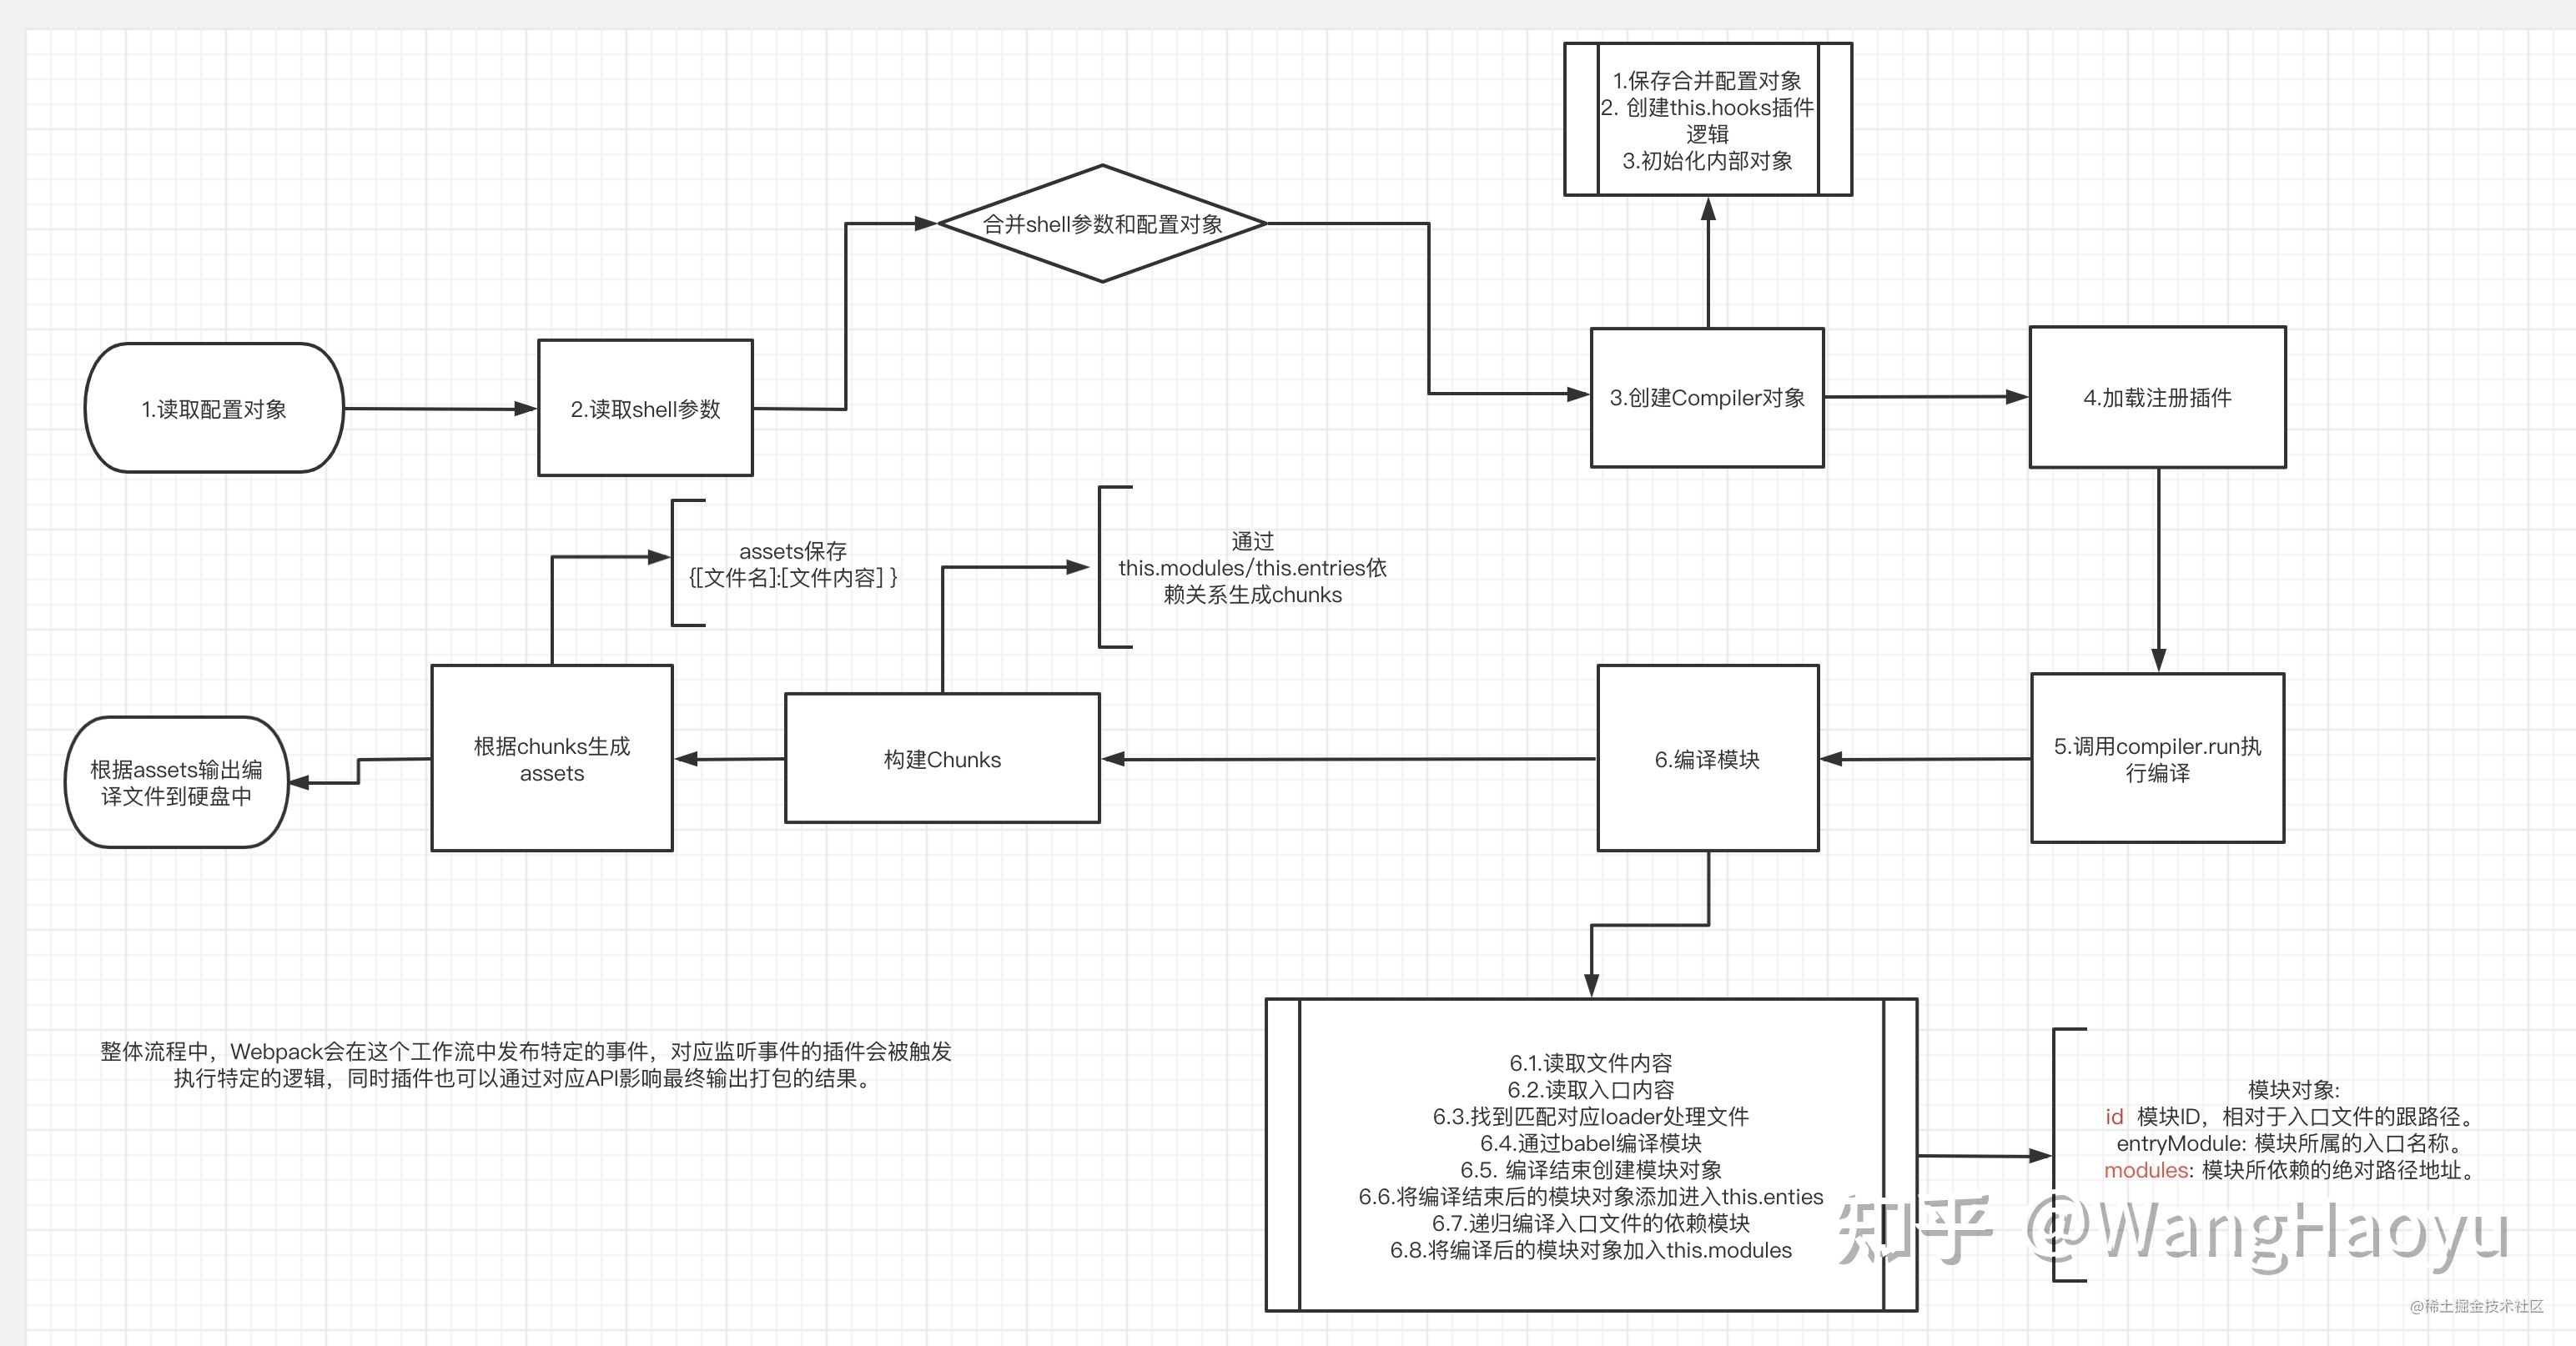
- 初始化参数阶段,我们会从webpack.config.js或者命令行中获取到编译参数,并将二者的参数合并得到最终的参数。
- 开始编译准备阶段,我们会调用webpack()方法创建一个compiler实例,并且注册每一个Plugin。找到配置参数中的入口文件,调用compiler.run()开始编译。
- 模块编译阶段,会从入口文件开始,根据文件后缀名,执行loader对该文件进行处理,通过分析依赖的模块,以递归的方式进行编译。
- 完成编译阶段,在模块递归编译完成后,根据模块的依赖关系,最终生成chunk。
- 输出文件阶段,根据配置文件的出口文件,将chunk转化成文件输出。
创建目录
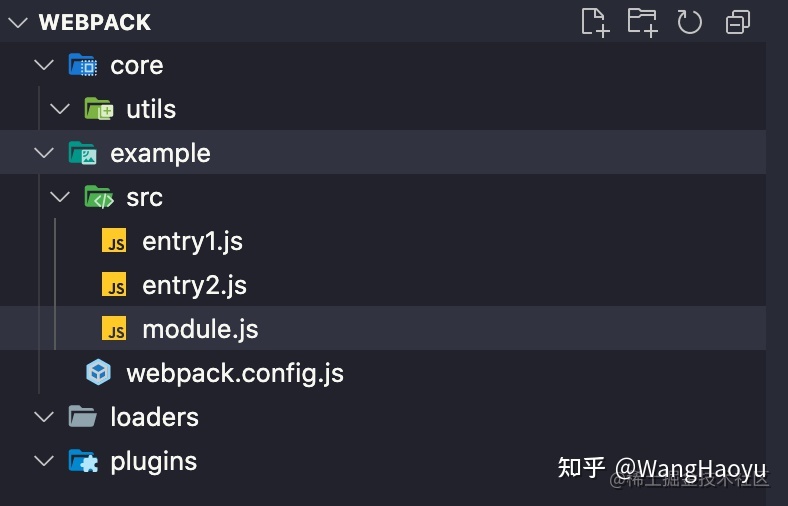
webpack/core存放我们自己将要实现的webpack核心代码。webpack/example存放我们将用来打包的实例项目。webpack/example/webpak.config.js配置文件.webpack/example/src/entry1第一个入口文件webpack/example/src/entry1第二个入口文件webpack/example/src/index.js模块文件
webpack/loaders存放我们的自定义loader。webpack/plugins存放我们的自定义plugin。
初始化参数阶段
合并参数
我们在webpack/core 文件夹下创建index.js 作为核心入口文件。同时建立webpack.js 作为webpack() 实现文件。通过webpack() 得到compiler实例。
在index.js 中我们引入wepack 方法和webpack.config.js ,将参数传入webpack() 得到compiler
function webpack(options) {
  // 合并参数 得到合并后的参数 mergeOptions
  const mergeOptions = _mergeOptions(options);
}

// 合并参数
function _mergeOptions(options) {
  const shellOptions = process.argv.slice(2).reduce((option, argv) => {
    // argv -> --mode=production
    const [key, value] = argv.split('=');
    if (key && value) {
      const parseKey = key.slice(2);
      option[parseKey] = value;
    }
    return option;
  }, {});
  return { ...options, ...shellOptions };
}

module.exports = webpack;
上面看到webpack() 返回compiler,其实compiler是一个类,现在我们新建webpack/core/compiler.js 来编写compiler类,
// compiler.js
// Compiler类进行核心编译实现
class Compiler {
  constructor(options) {
    this.options = options;
  }

  // run方法启动编译
  // 同时run方法接受外部传递的callback
  run(callback) {
  }
}

module.exports = Compiler
修改webpack()
function webpack(options) {
  // 合并参数 得到合并后的参数 mergeOptions
  const mergeOptions = _mergeOptions(options);
  // 创建compiler对象
  const compiler = new Compiler(mergeOptions)

  return compiler
}
这样我们就把配置参数合并,并且创建了一个compiler对象了。
编译准备阶段
编写plugin
在编写plugin之前,先完善一下compiler类
const { SyncHook } = require('tapable');

class Compiler {
  constructor(options) {
    this.options = options;
    // 创建plugin hooks
    this.hooks = {
      // 开始编译时的钩子
      run: new SyncHook(),
      // 输出 asset 到 output 目录之前执行 (写入文件之前)
      emit: new SyncHook(),
      // 在 compilation 完成时执行 全部完成编译执行
      done: new SyncHook(),
    };
  }

  // run方法启动编译
  // 同时run方法接受外部传递的callback
  run(callback) {}
}

module.exports = Compiler;
这里定义了hooks ,会在打包的不同流程时触发,当我们通过new SyncHook()返回一个对象实例后,我们可以通过this.hook.run.tap('name',callback)方法为这个对象上添加事件监听,然后在通过this.hook.run.call()执行所有tap注册的事件。
现在我们先切回webpack.js
const Compiler = require('./compiler');

function webpack(options) {
  // 合并参数
  const mergeOptions = _mergeOptions(options);
  // 创建compiler对象
  const compiler = new Compiler(mergeOptions);
  // 加载插件
  _loadPlugin(options.plugins, compiler);
  return compiler;
}

// 合并参数
function _mergeOptions(options) {
  const shellOptions = process.argv.slice(2).reduce((option, argv) => {
    // argv -> --mode=production
    const [key, value] = argv.split('=');
    if (key && value) {
      const parseKey = key.slice(2);
      option[parseKey] = value;
    }
    return option;
  }, {});
  return { ...options, ...shellOptions };
}

// 加载插件函数
function _loadPlugin(plugins, compiler) {
  if (plugins && Array.isArray(plugins)) {
    plugins.forEach((plugin) => {
      plugin.apply(compiler);
    });
  }
}

module.exports = webpack;
这里我们通过_loadPlugin 来加载配置中的插件,每个plugin 都有其apply 方法,plugin 本质上也是一个类,现在我们来开始编写一个plugin 类。
// plugin-a.js
// 插件A
class PluginA {
  apply(compiler) {
    // 注册同步钩子
    // 这里的compiler对象就是我们new Compiler()创建的实例哦
    compiler.hooks.run.tap('Plugin A', () => {
      // 调用
      console.log('PluginA');
    });
  }
}

module.exports = PluginA;

// plugin-b.js
class PluginB {
  apply(compiler) {
    compiler.hooks.done.tap('Plugin B', () => {
      console.log('PluginB');
    });
  }
}

module.exports = PluginB;
在这里我们就可以很清楚的明白,其实webpack插件本质上就是通过发布订阅的模式,通过compiler上监听事件。然后再打包编译过程中触发监听的事件从而添加一定的逻辑影响打包结果。
寻找入口文件
通过配置参数,获取入口文件路径。
// compiler.js
const { SyncHook } = require('tapable');
const { toUnixPath } = require('./utils');

class Compiler {
  constructor(options) {
    this.options = options;
    // 相对路径跟路径 Context参数
    this.rootPath = this.options.context || toUnixPath(process.cwd());
    // 创建plugin hooks
    this.hooks = {
      // 开始编译时的钩子
      run: new SyncHook(),
      // 输出 asset 到 output 目录之前执行 (写入文件之前)
      emit: new SyncHook(),
      // 在 compilation 完成时执行 全部完成编译执行
      done: new SyncHook(),
    };
  }

  // run方法启动编译
  // 同时run方法接受外部传递的callback
  run(callback) {
    // 当调用run方式时 触发开始编译的plugin
    this.hooks.run.call();
    // 获取入口配置对象
    const entry = this.getEntry();
  }

  // 获取入口文件路径
  getEntry() {
    let entry = Object.create(null);
    const { entry: optionsEntry } = this.options;
    if (typeof optionsEntry === 'string') {
      entry['main'] = optionsEntry;
    } else {
      entry = optionsEntry;
    }
    // 将entry变成绝对路径
    Object.keys(entry).forEach((key) => {
      const value = entry[key];
      if (!path.isAbsolute(value)) {
        // 转化为绝对路径的同时统一路径分隔符为 /
        entry[key] = toUnixPath(path.join(this.rootPath, value));
      }
    });
    return entry;
  }
}

module.exports = Compiler;

// utils/index.js
/**
 *
 * 统一路径分隔符 主要是为了后续生成模块ID方便
 * @param {*} path
 * @returns
 */
function toUnixPath(path) {
  return path.replace(/\\/g, '/');
}
这个阶段就是compiler 调用了run方法了。
this.hooks.run.tap
这个阶段相当于我们需要告诉订阅者,发布开始执行的订阅。此时我们通过this.hooks.run.call()执行关于run的所有tap监听方法,从而触发对应的plugin逻辑。
getEntry 函数返回了key为入口文件名称,value为入口文件绝对路径的对象entry
模块编译
上边我们讲述了关于编译阶段的准备工作:
- 目录/文件基础逻辑补充。
- 通过
hooks.tap注册webpack插件。 getEntry方法获得各个入口的对象。
接下来让我们继续完善compiler.js。
在模块编译阶段,我们需要做的事件:
- 根据入口文件路径分析入口文件,对于入口文件进行匹配对应的
loader进行处理入口文件。 - 将
loader处理完成的入口文件使用webpack进行编译。 - 分析入口文件依赖,重复上边两个步骤编译对应依赖。
- 如果嵌套文件存在依赖文件,递归调用依赖模块进行编译。
- 递归编译完成后,组装一个个包含多个模块的
chunk
首先我们来补充一下compiler.js的逻辑
class Compiler {
  constructor(options) {
    this.options = options;
    // 创建plugin hooks
    this.hooks = {
      // 开始编译时的钩子
      run: new SyncHook(),
      // 输出 asset 到 output 目录之前执行 (写入文件之前)
      emit: new SyncHook(),
      // 在 compilation 完成时执行 全部完成编译执行
      done: new SyncHook(),
    };
    // 保存所有入口模块对象
    this.entries = new Set();
    // 保存所有依赖模块对象
    this.modules = new Set();
    // 所有的代码块对象
    this.chunks = new Set();
    // 存放本次产出的文件对象
    this.assets = new Set();
    // 存放本次编译所有产出的文件名
    this.files = new Set();
  }
  // ...
 }
开始编译入口模块
class Compiler {
    // run方法启动编译
  // 同时run方法接受外部传递的callback
  run(callback) {
    // 当调用run方式时 触发开始编译的plugin
    this.hooks.run.call();
    // 获取入口配置对象
    const entry = this.getEntry();
    // 编译入口文件
    this.buildEntryModule(entry);
  }

  buildEntryModule(entry) {
    Object.keys(entry).forEach((entryName) => {
      const entryPath = entry[entryName];
      const entryObj = this.buildModule(entryName, entryPath);
      this.entries.add(entryObj);
    });
  }


  // 模块编译方法
  buildModule(moduleName,modulePath) {
    // ...
    return {}
  }
}
buildModule 是模块编译的核心方法
在进行代码编写之前,我们先来梳理一下buildModule方法它需要做哪些事情:
buildModule接受两个参数进行模块编译,第一个为模块所属的入口文件名称,第二个为需要编译的模块路径。buildModule方法要进行代码编译的前提就是,通过fs模块根据入口文件路径读取文件源代码。- 读取文件内容之后,调用所有匹配的loader对模块进行处理得到返回后的结果。
- 得到
loader处理后的结果后,通过babel分析loader处理后的代码,进行代码编译。(这一步编译主要是针对require语句,修改源代码中require语句的路径)。 - 如果该入口文件没有依赖与任何模块(
require语句),那么返回编译后的模块对象。 - 如果该入口文件存在依赖的模块,递归
buildModule方法进行模块编译。
读取文件内容
const fs = require('fs');
// ...
class Compiler {
      //...
      // 模块编译方法
      buildModule(moduleName, modulePath) {
        // 1. 读取文件原始代码
        const originSourceCode =
          ((this.originSourceCode = fs.readFileSync(modulePath, 'utf-8'));
        // moduleCode为修改后的代码
        this.moduleCode = originSourceCode;
      }

      // ...
 }
匹配loader
编写loader
首先我们需要清楚简单来说loader本质上就是一个函数,接受我们的源代码作为入参同时返回处理后的结果。
// loader本质上就是一个函数,接受原始内容,返回转换后的内容。
function loader1(sourceCode) {
  console.log('join loader1');
  return sourceCode + `\n const loader1 = 'https://github.com/19Qingfeng'`;
}

module.exports = loader1;

function loader2(sourceCode) {
  console.log('join loader2');
  return sourceCode + `\n const loader2 = '19Qingfeng'`;
}

module.exports = loader2;
使用loader处理文件
// 模块编译方法
  buildModule(moduleName, modulePath) {
    // 1. 读取文件原始代码
    const originSourceCode =
      ((this.originSourceCode = fs.readFileSync(modulePath)), 'utf-8');
    // moduleCode为修改后的代码
    this.moduleCode = originSourceCode;
    //  2. 调用loader进行处理
    this.handleLoader(modulePath);
  }

  // 匹配loader处理
  handleLoader(modulePath) {
    const matchLoaders = [];
    // 1. 获取所有传入的loader规则
    const rules = this.options.module.rules;
    rules.forEach((loader) => {
      const testRule = loader.test;
      if (testRule.test(modulePath)) {
        if (loader.loader) {
          // 仅考虑loader { test:/\.js$/g, use:['babel-loader'] }, { test:/\.js$/, loader:'babel-loader' }
          matchLoaders.push(loader.loader);
        } else {
          matchLoaders.push(...loader.use);
        }
      }
      // 2. 倒序执行loader传入源代码
      for (let i = matchLoaders.length - 1; i >= 0; i--) {
        // 目前我们外部仅支持传入绝对路径的loader模式
        // require引入对应loader
        const loaderFn = require(matchLoaders[i]);
        // 通过loader同步处理我的每一次编译的moduleCode
        this.moduleCode = loaderFn(this.moduleCode);
      }
    });
  }
buildModule 修改为读取模块文件代码后匹配对应的loader进行处理。
先是遍历rules获取到所有与该模块对应的loader,接着倒序传入loader进行编译。
现在只要把模块传入buildModule 就可以得到经过loader修改后的代码了。
webpack模块编译阶段
这里我们需要做的是:针对当前模块进行编译,将当前模块所有依赖的模块(require())语句引入的路径变为相对于跟路径(this.rootPath)的相对路径。
const parser = require('@babel/parser');
const traverse = require('@babel/traverse').default;
const generator = require('@babel/generator').default;
const t = require('@babel/types');
const tryExtensions = require('./utils/index')
// ...
  class Compiler {
     // ...

     // 模块编译方法
      buildModule(moduleName, modulePath) {
        // 1. 读取文件原始代码
        const originSourceCode =
          ((this.originSourceCode = fs.readFileSync(modulePath)), 'utf-8');
        // moduleCode为修改后的代码
        this.moduleCode = originSourceCode;
        //  2. 调用loader进行处理
        this.handleLoader(modulePath);
        // 3. 调用webpack 进行模块编译 获得最终的module对象
        const module = this.handleWebpackCompiler(moduleName, modulePath);
        // 4. 返回对应module
        return module
      }

      // 调用webpack进行模块编译
      handleWebpackCompiler(moduleName, modulePath) {
        // 将当前模块相对于项目启动根目录计算出相对路径 作为模块ID
        const moduleId = './' + path.posix.relative(this.rootPath, modulePath);
        // 创建模块对象
        const module = {
          id: moduleId,
          dependencies: new Set(), // 该模块所依赖模块绝对路径地址
          name: [moduleName], // 该模块所属的入口文件
        };
        // 调用babel分析我们的代码
        const ast = parser.parse(this.moduleCode, {
          sourceType: 'module',
        });
        // 深度优先 遍历语法Tree
        traverse(ast, {
          // 当遇到require语句时
          CallExpression:(nodePath) => {
            const node = nodePath.node;
            if (node.callee.name === 'require') {
              // 获得源代码中引入模块相对路径
              const requirePath = node.arguments[0].value;
              // 寻找模块绝对路径 当前模块路径+require()对应相对路径
              const moduleDirName = path.posix.dirname(modulePath);
              const absolutePath = tryExtensions(
                path.posix.join(moduleDirName, requirePath),
                this.options.resolve.extensions,
                requirePath,
                moduleDirName
              );
              // 生成moduleId - 针对于跟路径的模块ID 添加进入新的依赖模块路径
              const moduleId =
                './' + path.posix.relative(this.rootPath, absolutePath);
              // 通过babel修改源代码中的require变成__webpack_require__语句
              node.callee = t.identifier('__webpack_require__');
              // 修改源代码中require语句引入的模块 全部修改变为相对于跟路径来处理
              node.arguments = [t.stringLiteral(moduleId)];
              // 为当前模块添加require语句造成的依赖(内容为相对于根路径的模块ID)
              module.dependencies.add(moduleId);
            }
          },
        });
        // 遍历结束根据AST生成新的代码
        const { code } = generator(ast);
        // 为当前模块挂载新的生成的代码
        module._source = code;
        // 返回当前模块对象
        return module
      }
  }
关注handleWebpackCompiler 方法,这里我们计算出了模块相对于根路径的相对路径计算作为模块的id出来,接着创建了模块对象,深度优先遍历ast语法树,当匹配到require时就将依赖的模块也计算出相对于根路径的相对路径作为模块id加入module.dependenices ,然后将源代码中的require改为__webpack_require__
递归处理
我们只需要在最后添加
// 递归依赖深度遍历 存在依赖模块则加入
    module.dependencies.forEach((dependency) => {
      const depModule = this.buildModule(moduleName, dependency);
      // 将编译后的任何依赖模块对象加入到modules对象中去
      this.modules.add(depModule);
    });
这样我们就可以获得

这样我们就可以获得解析后的入口文件对象,和所有入口文件依赖的对象
Set {
  {
    id: './example/src/entry1.js',
    dependencies: Set { './example/src/module.js' },
    name: [ 'main' ],
    _source: 'const depModule = __webpack_require__("./example/src/module.js");\n' +
      '\n' +
      "console.log(depModule, 'dep');\n" +
      "console.log('This is entry 1 !');\n" +
      "const loader2 = '19Qingfeng';\n" +
      "const loader1 = 'https://github.com/19Qingfeng';"
  },
  {
    id: './example/src/entry2.js',
    dependencies: Set { './example/src/module.js' },
    name: [ 'second' ],
    _source: 'const depModule = __webpack_require__("./example/src/module.js");\n' +
      '\n' +
      "console.log(depModule, 'dep');\n" +
      "console.log('This is entry 2 !');\n" +
      "const loader2 = '19Qingfeng';\n" +
      "const loader1 = 'https://github.com/19Qingfeng';"
  }
} entries
Set {
  {
    id: './example/src/module.js',
    dependencies: Set {},
    name: [ 'main' ],
    _source: "const name = '19Qingfeng';\n" +
      'module.exports = {\n' +
      '  name\n' +
      '};\n' +
      "const loader2 = '19Qingfeng';\n" +
      "const loader1 = 'https://github.com/19Qingfeng';"
  },
  {
    id: './example/src/module.js',
    dependencies: Set {},
    name: [ 'second' ],
    _source: "const name = '19Qingfeng';\n" +
      'module.exports = {\n' +
      '  name\n' +
      '};\n' +
      "const loader2 = '19Qingfeng';\n" +
      "const loader1 = 'https://github.com/19Qingfeng';"
  }
} modules
这里module.js 被引用了两次,对handleWebpackCompiler进行一下优化
    handleWebpackCompiler(moduleName, modulePath) {
       ...
        // 通过babel修改源代码中的require变成__webpack_require__语句
          node.callee = t.identifier('__webpack_require__');
          // 修改源代码中require语句引入的模块 全部修改变为相对于跟路径来处理
          node.arguments = [t.stringLiteral(moduleId)];
          // 转化为ids的数组 好处理
          const alreadyModules = Array.from(this.modules).map((i) => i.id);
          if (!alreadyModules.includes(moduleId)) {
            // 为当前模块添加require语句造成的依赖(内容为相对于根路径的模块ID)
            module.dependencies.add(moduleId);
          } else {
            // 已经存在的话 虽然不进行添加进入模块编译 但是仍要更新这个模块依赖的入口
            this.modules.forEach((value) => {
              if (value.id === moduleId) {
                value.name.push(moduleName);
              }
            });
          }
        }
      },
    });
    ...
    }
此时针对我们的“模块编译阶段”基本已经结束了,这一步我们对于所有模块从入口文件开始进行分析。
- 从入口出发,读取入口文件内容调用匹配
loader处理入口文件。 - 通过
babel分析依赖,并且同时将所有依赖的路径更换为相对于项目启动目录options.context的路径。 - 入口文件中如果存在依赖的话,递归上述步骤编译依赖模块。
- 将每个依赖的模块编译后的对象加入
this.modules。 - 将每个入口文件编译后的对象加入
this.entries。
编译完成阶段
在将所有模块递归编译完成后,我们需要根据上述的依赖关系,组合最终输出的chunk模块。
class Compiler {

    // ...
    buildEntryModule(entry) {
        Object.keys(entry).forEach((entryName) => {
          const entryPath = entry[entryName];
          // 调用buildModule实现真正的模块编译逻辑
          const entryObj = this.buildModule(entryName, entryPath);
          this.entries.add(entryObj);
          // 根据当前入口文件和模块的相互依赖关系,组装成为一个个包含当前入口所有依赖模块的chunk
          this.buildUpChunk(entryName, entryObj);
        });
        console.log(this.chunks, 'chunks');
    }

     // 根据入口文件和依赖模块组装chunks
      buildUpChunk(entryName, entryObj) {
        const chunk = {
          name: entryName, // 每一个入口文件作为一个chunk
          entryModule: entryObj, // entry编译后的对象
          modules: Array.from(this.modules).filter((i) =>
            i.name.includes(entryName)
          ), // 寻找与当前entry有关的所有module
        };
        // 将chunk添加到this.chunks中去
        this.chunks.add(chunk);
      }

      // ...
}
关注buildUpChunk 方法,chunk是一个对象,包括入口文件的名称,入口文件编译后的对象和其依赖的模块
Set {
  {
    name: 'main',
    entryModule: {
      id: './example/src/entry1.js',
      dependencies: [Set],
      name: [Array],
      _source: 'const depModule = __webpack_require__("./example/src/module.js");\n' +
        '\n' +
        "console.log(depModule, 'dep');\n" +
        "console.log('This is entry 1 !');\n" +
        "const loader2 = '19Qingfeng';\n" +
        "const loader1 = 'https://github.com/19Qingfeng';"
    },
    modules: [ [Object] ]
  },
  {
    name: 'second',
    entryModule: {
      id: './example/src/entry2.js',
      dependencies: Set {},
      name: [Array],
      _source: 'const depModule = __webpack_require__("./example/src/module.js");\n' +
        '\n' +
        "console.log(depModule, 'dep');\n" +
        "console.log('This is entry 2 !');\n" +
        "const loader2 = '19Qingfeng';\n" +
        "const loader1 = 'https://github.com/19Qingfeng';"
    },
    modules: []
  }
}
这一步,我们得到了Webpack中最终输出的两个chunk。
它们分别拥有:
name:当前入口文件的名称entryModule: 入口文件编译后的对象。modules: 该入口文件依赖的所有模块对象组成的数组,其中每一个元素的格式和entryModule是一致的。
此时编译完成我们拼装chunk的环节就圆满完成。
输出文件阶段
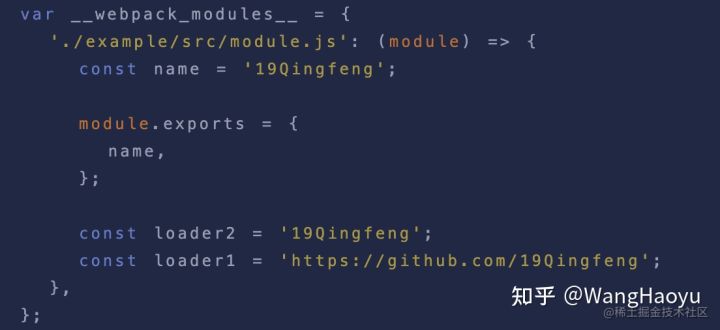
我们先来看下用原本webpack打包出来的样子
(() => {
  var __webpack_modules__ = {
    './example/src/module.js': (module) => {
      const name = '19Qingfeng';

      module.exports = {
        name,
      };

      const loader2 = '19Qingfeng';
      const loader1 = 'https://github.com/19Qingfeng';
    },
  };
  // The module cache
  var __webpack_module_cache__ = {};

  // The require function
  function __webpack_require__(moduleId) {
    // Check if module is in cache
    var cachedModule = __webpack_module_cache__[moduleId];
    if (cachedModule !== undefined) {
      return cachedModule.exports;
    }
    // Create a new module (and put it into the cache)
    var module = (__webpack_module_cache__[moduleId] = {
      // no module.id needed
      // no module.loaded needed
      exports: {},
    });

    // Execute the module function
    __webpack_modules__[moduleId](module, module.exports, __webpack_require__);

    // Return the exports of the module
    return module.exports;
  }

  var __webpack_exports__ = {};
  // This entry need to be wrapped in an IIFE because it need to be isolated against other modules in the chunk.
  (() => {
    const depModule = __webpack_require__(
      /*! ./module */ './example/src/module.js'
    );

    console.log(depModule, 'dep');
    console.log('This is entry 1 !');

    const loader2 = '19Qingfeng';
    const loader1 = 'https://github.com/19Qingfeng';
  })();
})();
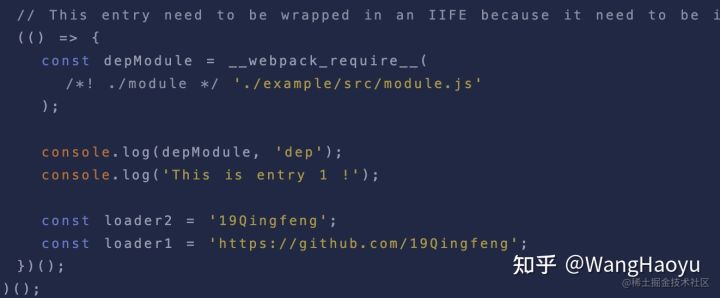
这一块是入口文件代码
这一块是入口文件依赖的代码
回到compiler的run方法
   class Compiler {

   }
  // run方法启动编译
  // 同时run方法接受外部传递的callback
  run(callback) {
    // 当调用run方式时 触发开始编译的plugin
    this.hooks.run.call();
    // 获取入口配置对象
    const entry = this.getEntry();
    // 编译入口文件
    this.buildEntryModule(entry);
    // 导出列表;之后将每个chunk转化称为单独的文件加入到输出列表assets中
    this.exportFile(callback);
  }
exportFile方法
// 将chunk加入输出列表中去
  exportFile(callback) {
    const output = this.options.output;
    // 根据chunks生成assets内容
    this.chunks.forEach((chunk) => {
      const parseFileName = output.filename.replace('[name]', chunk.name);
      // assets中 { 'main.js': '生成的字符串代码...' }
      this.assets[parseFileName] = getSourceCode(chunk);
    });
    // 调用Plugin emit钩子
    this.hooks.emit.call();
    // 先判断目录是否存在 存在直接fs.write 不存在则首先创建
    if (!fs.existsSync(output.path)) {
      fs.mkdirSync(output.path);
    }
    // files中保存所有的生成文件名
    this.files = Object.keys(this.assets);
    // 将assets中的内容生成打包文件 写入文件系统中
    Object.keys(this.assets).forEach((fileName) => {
      const filePath = path.join(output.path, fileName);
      fs.writeFileSync(filePath, this.assets[fileName]);
    });
    // 结束之后触发钩子
    this.hooks.done.call();
    callback(null, {
      toJson: () => {
        return {
          entries: this.entries,
          modules: this.modules,
          files: this.files,
          chunks: this.chunks,
          assets: this.assets,
        };
      },
    });
  }
exportFile做了如下几件事:
- 首先获取配置参数的输出配置,迭代我们的
this.chunks,将output.filename中的[name]替换称为对应的入口文件名称。同时根据chunks的内容为this.assets中添加需要打包生成的文件名和文件内容。 - 将文件写入磁盘前调用
plugin的emit钩子函数。 - 判断
output.path文件夹是否存在,如果不存在,则通过fs新建这个文件夹。 - 将本次打包生成的所有文件名(
this.assets的key值组成的数组)存放进入files中去。 - 循环
this.assets,将文件依次写入对应的磁盘中去。 - 所有打包流程结束,触发
webpack插件的done钩子。 - 同时为
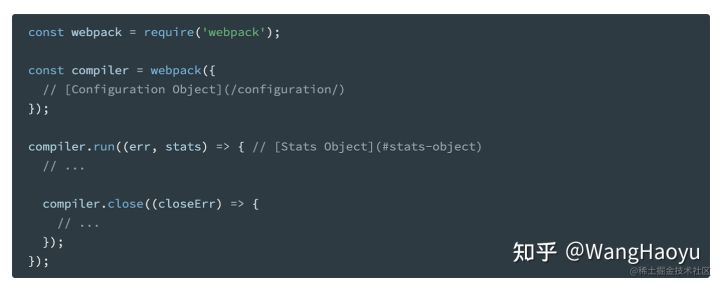
NodeJs Webpack APi呼应,调用run方法中外部传入的callback传入两个参数。
getSourceCode方法
// webpack/utils/index.js

...


/**
 *
 *
 * @param {*} chunk
 * name属性入口文件名称
 * entryModule入口文件module对象
 * modules 依赖模块路径
 */
function getSourceCode(chunk) {
  const { name, entryModule, modules } = chunk;
  return `
  (() => {
    var __webpack_modules__ = {
      ${modules
        .map((module) => {
          return `
          '${module.id}': (module) => {
            ${module._source}
      }
        `;
        })
        .join(',')}
    };
    // The module cache
    var __webpack_module_cache__ = {};

    // The require function
    function __webpack_require__(moduleId) {
      // Check if module is in cache
      var cachedModule = __webpack_module_cache__[moduleId];
      if (cachedModule !== undefined) {
        return cachedModule.exports;
      }
      // Create a new module (and put it into the cache)
      var module = (__webpack_module_cache__[moduleId] = {
        // no module.id needed
        // no module.loaded needed
        exports: {},
      });

      // Execute the module function
      __webpack_modules__[moduleId](module, module.exports, __webpack_require__);

      // Return the exports of the module
      return module.exports;
    }

    var __webpack_exports__ = {};
    // This entry need to be wrapped in an IIFE because it need to be isolated against other modules in the chunk.
    (() => {
      ${entryModule._source}
    })();
  })();
  `;
}
...
就是将chunk中的内容拼接成新的代码,和原本webpack输出一样的代码
这样我们实现了我们自己的webpack了
流程图